https://www.howtoforge.com/tutorial/vim-editor-plugins-for-software-developers
An improved version of Vi, Vim is unarguably one of the most popular command line-based text editors in Linux. Besides being a feature-rich text editor, Vim is also used as an IDE (Integrated Development Environment) by software developers around the world.
What makes Vim really powerful is the fact that it's functionality can be extended through plugins. And needless to say, there exist several Vim plugins that are aimed at enhancing users' programming experience.
Especially for software developers who are new to Vim, and are using the editor for development purposes, we'll be discussing some useful Vim plugins - along with examples - in this tutorial.
Please note that all the examples, commands,
and instructions mentioned in this tutorial have been tested on Ubuntu
16.04, and the Vim version we've used is 7.4.
 That's it. You are now ready to install Vim plugins.
Note: Here we've discussed Vim plugin management using Pathogen. There are other plugin managers available as well - to get started, visit this thread.
Now that we are all set, let's discuss a couple of useful Vim plugins.
Sounds cool, right? Now, lets see how you can install it.
Tagbar's installation is pretty easy - all you have to do is to run the following two commands:
 To close the sidebar, use the :TagbarClose command. What's worth mentioning here is that you can use the :TagbarOpen fj
command to open the sidebar as well as shift control to it. This way,
you can easily browse the tags it contains - pressing the Enter key on a
tag brings up (and shifts control to) the corresponding function in the
source code window on the left.
To close the sidebar, use the :TagbarClose command. What's worth mentioning here is that you can use the :TagbarOpen fj
command to open the sidebar as well as shift control to it. This way,
you can easily browse the tags it contains - pressing the Enter key on a
tag brings up (and shifts control to) the corresponding function in the
source code window on the left.
 In case you want to repeatedly open and close the sidebar, you can use the :TagbarToggle command instead of using :TagbarOpen and :TagbarClose, respectively.
If typing these commands seems time consuming to you, then you can create a shortcut for the :TagbarToggle command. For example, if you put the following line in your .vimrc file:
Moving on, sometimes you'll observe that certain tags are pre-fixed with a +, -, or
 These symbols basically depict the visibility information for a particular tag. Specifically,
It also offers "some other related features that should make your time in insert mode a little bit easier, like syntax awareness (will not insert the closing delimiter in comments and other configurable regions), and expansions (off by default), and some more," the plugin's official github page says.
Installation of this plugin is similar to the way we installed the previous one:
Now, whenever - while in Vim - you type a double quote, single quote, brace, parentheses, or bracket, they'll be automatically completed.
The delimitMate plugin is configurable. For example, you can extend the list of supported symbols, prevent the plugin from loading automatically, turns off the plugin for certain file types, and more. To learn how to configure delimitMate to do all this (and much more), go through the plugin's detailed documentation, which you can access by running the :help delimitMate command.
The aforementioned command will split your Vim window horizontally into two, with the upper part containing the said documentation.
The tutorial would have given you an idea how useful Vim plugins can be. Apart from the ones discussed here, there are many more plugins available for software developers. We'll discuss a selected bunch in the next part. Meanwhile, drop in a comment if you use a cool development-related Vim plugin and want others to know about it.
In part 2 of this tutorial series I will cover the Syntax highlighting plugin Syntastic.
An improved version of Vi, Vim is unarguably one of the most popular command line-based text editors in Linux. Besides being a feature-rich text editor, Vim is also used as an IDE (Integrated Development Environment) by software developers around the world.
What makes Vim really powerful is the fact that it's functionality can be extended through plugins. And needless to say, there exist several Vim plugins that are aimed at enhancing users' programming experience.
Especially for software developers who are new to Vim, and are using the editor for development purposes, we'll be discussing some useful Vim plugins - along with examples - in this tutorial.
Plugin installation setup
Given that the tutorial is aimed at new users, it would be reasonable to assume that they don't know how Vim plugins are installed. So, first up, here are the steps required to complete the installation setup:- Create a directory dubbed .vim in your home directory, and then create two sub-directories named autoload and bundle.
- Then, inside the autoload directory, you need to place a file named pathogen.vim, which you can download from here.
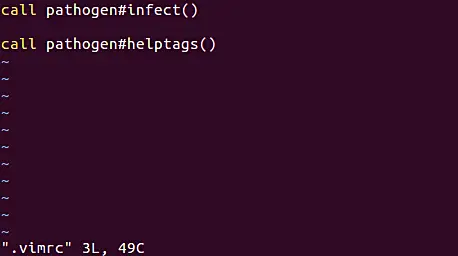
- Finally, create a file named .vimrc in your home directory and add the following two lines to it:
call pathogen#infect()
call pathogen#helptags()

Note: Here we've discussed Vim plugin management using Pathogen. There are other plugin managers available as well - to get started, visit this thread.
Now that we are all set, let's discuss a couple of useful Vim plugins.
Vim Tagbar plugin
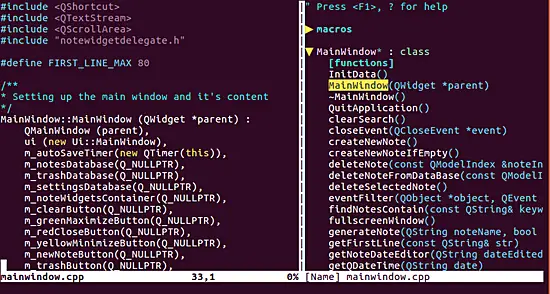
First up is the Tagbar plugin. This plugin gives you an overview of the structure of a source file by letting you browse the tags it contains. "It does this by creating a sidebar that displays the ctags-generated tags of the current file, ordered by their scope," the plug-in's official website says. "This means that for example methods in C++ are displayed under the class they are defined in."Sounds cool, right? Now, lets see how you can install it.
Tagbar's installation is pretty easy - all you have to do is to run the following two commands:
cd ~/.vim/bundle/
git clone git://github.com/majutsushi/tagbar
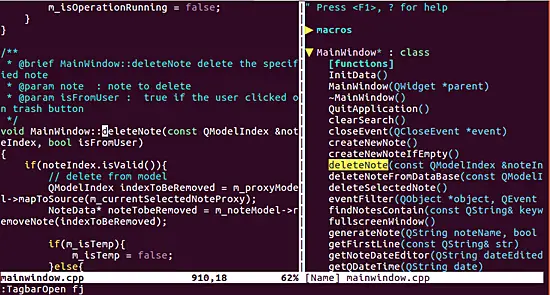
After the plugin is installed, it's ready for use. You can test it out by opening a .cpp file in Vim, entering the command mode, and running the :TagbarOpen command. Following is an example screenshot showing the sidebar (towards right) that comes up when the :TagbarOpen Vim command was executed:
If typing these commands seems time consuming to you, then you can create a shortcut for the :TagbarToggle command. For example, if you put the following line in your .vimrc file:
nmapthen you can use the F8 key to toggle the Tagbar plugin window.:TagbarToggle
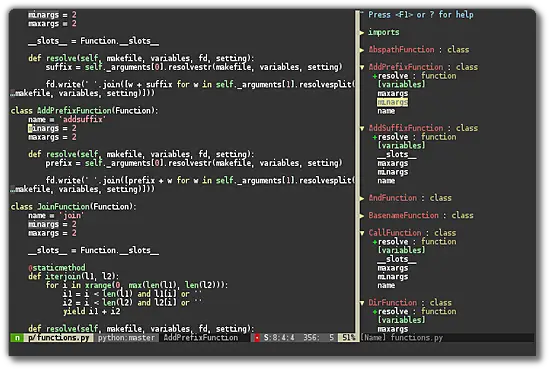
Moving on, sometimes you'll observe that certain tags are pre-fixed with a +, -, or
#
symbol. For example, the following screenshot (taken from the plugin's
official website) shows some tags prefixed with a + symbol.
+ indicates that the member is public, while - indicates a private member. The # symbol, on the other hand, indicates that the member is protected.- The plugin website makes it clear that "Tagbar is not a general-purpose tool for managing
tagsfiles. It only creates the tags it needs on-the-fly in-memory without creating any files.tagsfile management is provided by other plugins." - Vim versions < 7.0.167 have a compatibility issue with Tagbar. "If you are affected by this use this alternate Tagbar download instead: zip," the website says. "It is on par with version 2.2 but probably won't be updated after that due to the amount of changes required."
- If you encounter the error Tagbar: Exuberant ctags not found! while launching the plugin, then you can fix it by downloading and installing ctags from here.
- For more information on Tagbar, head here.
Vim delimitMate Plugin
The next plugin we'll be discussing here is delimitMate. The plugin basically provides insert mode auto-completion for quotes, parens, brackets, and more.It also offers "some other related features that should make your time in insert mode a little bit easier, like syntax awareness (will not insert the closing delimiter in comments and other configurable regions), and expansions (off by default), and some more," the plugin's official github page says.
Installation of this plugin is similar to the way we installed the previous one:
cd ~/.vim/bundle/
git clone git://github.com/Raimondi/delimitMate.git
Once the plugin is installed successfully (meaning the above commands
are successful), you don't have to do anything else - it loads
automatically when the Vim editor is launched.Now, whenever - while in Vim - you type a double quote, single quote, brace, parentheses, or bracket, they'll be automatically completed.
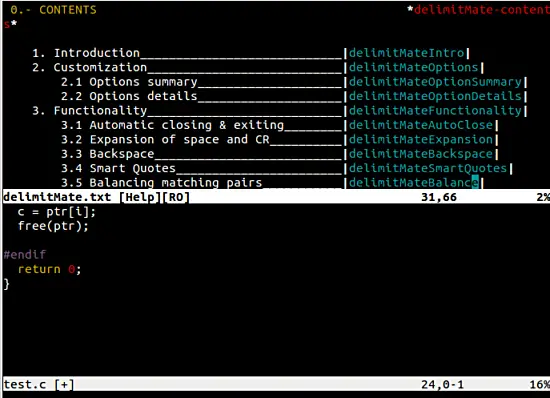
The delimitMate plugin is configurable. For example, you can extend the list of supported symbols, prevent the plugin from loading automatically, turns off the plugin for certain file types, and more. To learn how to configure delimitMate to do all this (and much more), go through the plugin's detailed documentation, which you can access by running the :help delimitMate command.
The aforementioned command will split your Vim window horizontally into two, with the upper part containing the said documentation.

Conclusion
Of the two plugins mentioned in this article, Tagbar - you'll likely agree - requires comparatively more time to get used to. But once it's setup properly (meaning you have things like shortcut launch keys in place), it's a breeze to use. delimitMate, on the other hand, doesn't require you to remember anything.The tutorial would have given you an idea how useful Vim plugins can be. Apart from the ones discussed here, there are many more plugins available for software developers. We'll discuss a selected bunch in the next part. Meanwhile, drop in a comment if you use a cool development-related Vim plugin and want others to know about it.
In part 2 of this tutorial series I will cover the Syntax highlighting plugin Syntastic.

No comments:
Post a Comment