http://www.cyberciti.biz/faq/howto-install-rsnapshot-filesystem-snapshot-backup-utility-in-freebsd
How do I install rsnapshot a filesystem snapshot utility based on rsync on my FreeBSD server to backup my local/remote Linux and Unix-based desktop, server and laptop system?
The rsnapshot is a filesystem snapshot utility based on rsync command. rsnapshot makes it easy to make periodic snapshots of local machines, and remote machines over ssh. The code makes extensive use of hard links whenever possible, to greatly reduce the disk space required. It is written entirely in perl with no module dependencies, and has been tested with Perl versions 5.004 through 5.8.1. In this tutorial you will learn how to create FreeBSD based backup server to keep backups in hourly, daily, monthly, and yearly format.
Sample outputs:
Sample outputs:
Or install it using the port
Next, edit /usr/local/etc/rsnapshot.conf, enter:
Update and uncomment as follows:
Sample outputs:
Sample outputs:
Sample outputs:
Sample outputs:
Sample outputs:
Append the following entries:
And, there you have it, the rsnapshot backup utility installed and working correctly on the latest version of FreeBSD server to backup local and remote servers or desktop system.
How do I install rsnapshot a filesystem snapshot utility based on rsync on my FreeBSD server to backup my local/remote Linux and Unix-based desktop, server and laptop system?
The rsnapshot is a filesystem snapshot utility based on rsync command. rsnapshot makes it easy to make periodic snapshots of local machines, and remote machines over ssh. The code makes extensive use of hard links whenever possible, to greatly reduce the disk space required. It is written entirely in perl with no module dependencies, and has been tested with Perl versions 5.004 through 5.8.1. In this tutorial you will learn how to create FreeBSD based backup server to keep backups in hourly, daily, monthly, and yearly format.
Install rsnapshot on FreeBSD server
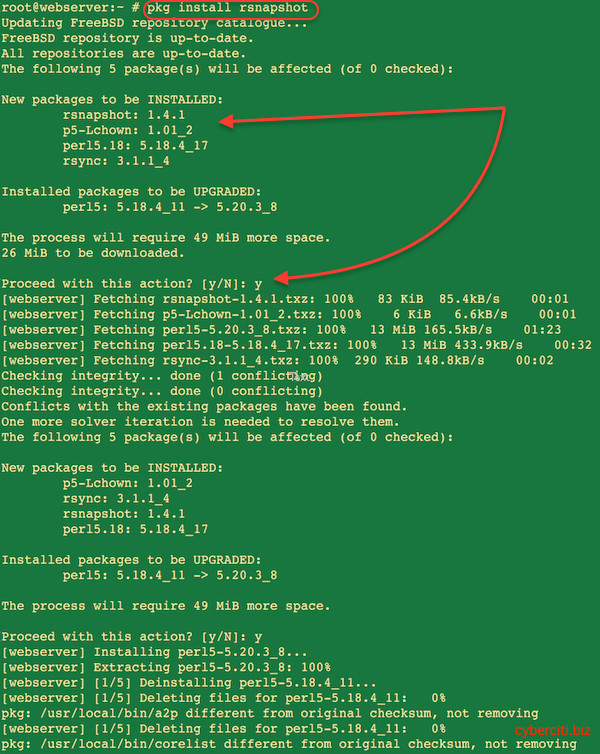
Type the following command to update pkg database:# pkg updateSample outputs:
Updating FreeBSD repository catalogue...
FreeBSD repository is up-to-date.
All repositories are up-to-date.
To install the binary package, enter:
# pkg install rsnapshotSample outputs:
Fig.01: To add the package type 'pkg install rsnapshot' command
Or install it using the port
# cd /usr/ports/sysutils/rsnapshot/
 # make install clean
Configure rsnapshot on FreeBSD box
First, copy /usr/local/etc/rsnapshot.conf.default to /usr/local/etc/rsnapshot.conf, run:# cp -v /usr/local/etc/rsnapshot.conf.default /usr/local/etc/rsnapshot.confNext, edit /usr/local/etc/rsnapshot.conf, enter:
Attention! This file requires tabs between elements to avoid syntax errors.
# vi /usr/local/etc/rsnapshot.confUpdate and uncomment as follows:
# All snapshots will be stored under this root directory.
snapshot_root   /securebackup/root.user.only/rsnapshot/

#########################################
#     BACKUP LEVELS / INTERVALS         #
# Must be unique and in ascending order #
# e.g. alpha, beta, gamma, etc.         #
#########################################
# 6 hourly snapshots - daily (every 4 hour)
# 1 daily snapshot - daily
# 4 weekly snapshots - weekly (Sunday)
# 12 monthly snapshots - 1st day of every month
################################################

retain  hourly  6
retain  daily   7
retain  weekly  4
retain  monthly 12

# If you enable this, data will be written to the file you specify.
logfile /var/log/rsnapshot

# Exclude these files from backups
exclude_file    /usr/local/etc/rsnapshot.exclude.txt

###################################
### SET BACKUP POINTS / SCRIPTS ###
###################################

# LOCALHOST/nas04 Backup our own local freebsd box first
backup  /home/          nas04/
backup  /etc/           nas04/
backup  /usr/local/     nas04/

# Okay backup our remote web server called 10.12.249.194
backup  root@10.12.249.194:/etc/        wwwserver1/
backup  root@10.12.249.194:/root/       wwwserver1/
backup  root@10.12.249.194:/home/       wwwserver1/
backup  root@10.12.249.194:/scripts/    wwwserver1/
backup  root@10.12.249.194:/usr/share/lxc/      wwwserver1/
backup  root@10.12.249.194:/lib/ufw/    swwwserver1/
backup  root@10.12.249.194:/var/www/    swwwserver1/

# Backup mysql database too
backup_script   /usr/bin/ssh root@10.12.249.194 "/scripts/mysql/backup.nas.sh"        unused1/
backup_script   /usr/bin/scp -r root@10.12.249.194:/backups/mysql/nas/ /securebackup/root.user.only/rsnapshot/tmp/    mysql/wwwserver1/

# Backup v.backup2 server too
backup  root@v.backup2:/root/   backup2/
backup  root@v.backup2:/etc/    backup2/
backup  root@v.backup2:/var/www/    backup2/
Install mysql backup helper script in 10.12.249.194 remote server
Create a script as follows at /scripts/mysql/backup.nas.sh location on your MySQL server:#!/bin/bash # Name: backup.nas.sh # Author: Vivek Giteunder GPL v2.x+ # Purpose: Backup mysql databases for rsnapshot # Tested on: RHEL/CentOS/Debian/Ubuntu only # --------------------------------------------------------- MUSER='YOUR-USERNAME-HERE' MPASS='YOUR-PASSWORD-HERE' MHOST='YOUR-HOSTNAME-HERE' DEST="/backups/mysql/nas" NOWFORMAT="%m_%d_%Y_%H_%M_%S%P" MYSQL="/usr/bin/mysql" MYSQLDUMP="/usr/bin/mysqldump" MKDIR="/bin/mkdir" RM="/bin/rm" GZIP="/bin/gzip" DATE="/bin/date" SED="/bin/sed" [ ! -d "$DEST" ] && $MKDIR -p "$DEST" DBS="$($MYSQL -u $MUSER -h $MHOST -p$MPASS -Bse 'show databases')" DBS="$($SED -e 's/performance_schema//' -e 's/information_schema//' <<<$DBS)" $RM -f $DEST/* >/dev/null 2>&1 for db in $DBS do tTime=$(date +"${NOWFORMAT}") FILE="$DEST/${db}.${tTime}.gz" $MYSQLDUMP -u $MUSER -h $MHOST -p$MPASS $db | $GZIP -9 > $FILE done
Install keychain on FreeBSD server
Type the following command to install user-friendly front-end to ssh-agent for password less login to the remote server:# pkg install keychainSample outputs:
Updating FreeBSD repository catalogue...
FreeBSD repository is up-to-date.
All repositories are up-to-date.
The following 1 package(s) will be affected (of 0 checked):

New packages to be INSTALLED:
	keychain: 2.8.2

The process will require 95 KiB more space.
35 KiB to be downloaded.

Proceed with this action? [y/N]: y
[webserver] Fetching keychain-2.8.2.txz: 100%   35 KiB  35.8kB/s    00:01
Checking integrity... done (0 conflicting)
[webserver] [1/1] Installing keychain-2.8.2...
[webserver] [1/1] Extracting keychain-2.8.2: 100%
Append the following entries in your shell startup file. I'm using default CSH on my FreeBSD as root user:
echo '/usr/local/bin/keychain --clear $HOME/.ssh/id_rsa' >> /root/.cshrc
echo 'source $HOME/.keychain/webserver-csh' >> /root/.cshrc
Install and configure ssh keys on FreeBSD box only
You need to set up public key authentication and use keychain to manage your keys:# ssh-keygen -t rsaSample outputs:
Generating public/private rsa key pair.
Enter file in which to save the key (/root/.ssh/id_rsa):
Created directory '/root/.ssh'.
Enter passphrase (empty for no passphrase): {ENTER-YOUR-PASSPHRASE-HERE}
Enter same passphrase again: {again-ENTER-YOUR-PASSPHRASE-HERE}
Your identification has been saved in /root/.ssh/id_rsa.
Your public key has been saved in /root/.ssh/id_rsa.pub.
The key fingerprint is:
5b:74:30:c8:4a:10:78:a3:eb:ce:bd:ee:87:40:82:7f root@webserver
The key's randomart image is:
+--[ RSA 2048]----+
|   .oo . .o      |
|  . o . o  o     |
|.  o o .  . .    |
|o o   .  . .     |
| + .    S .      |
|  + E    o       |
| . o .  .        |
| .... .          |
| .oo=o           |
+-----------------+
You need to set the Key Pair location and name. I recommend you use the default location if you do not yet have another key there, for example: $HOME/.ssh/id_rsa. You will be prompted to supply a passphrase (password) for your private key. I suggest that you setup a passphrase when prompted. Install the public key in remote server called v.backup2 and 10.12.249.194. First, install ssh-copy-id - a small script which copies your ssh public-key to a remote host, run:
# pkg install ssh-copy-idSample outputs:
Updating FreeBSD repository catalogue...
FreeBSD repository is up-to-date.
All repositories are up-to-date.
The following 1 package(s) will be affected (of 0 checked):

New packages to be INSTALLED:
	ssh-copy-id: 5.6p1

The process will require 2 KiB more space.
2 KiB to be downloaded.

Proceed with this action? [y/N]: y
[webserver] Fetching ssh-copy-id-5.6p1.txz: 100%    2 KiB   2.5kB/s    00:01
Checking integrity... done (0 conflicting)
[webserver] [1/1] Installing ssh-copy-id-5.6p1...
[webserver] [1/1] Extracting ssh-copy-id-5.6p1: 100%
Now, install the pub keys:
# ssh-copy-id -i $HOME/.ssh/id_rsa.pub user@10.12.249.194
 # ssh-copy-id -i $HOME/.ssh/id_rsa.pub user@v.backup2
Test your configuration on FreeBSD
Type the following command:# rsnapshot configtest
# rsnapshot -c /usr/local/etc/rsnapshot.conf configtestSample outputs:
Syntax OKYou can see shell commands that would be executed by this utility:
# rsnapshot -t hourly
 # rsnapshot -t daily
 # rsnapshot -t weekly
 # rsnapshot -t monthly
Run rsnapshot and make your first backups on FreeBSD
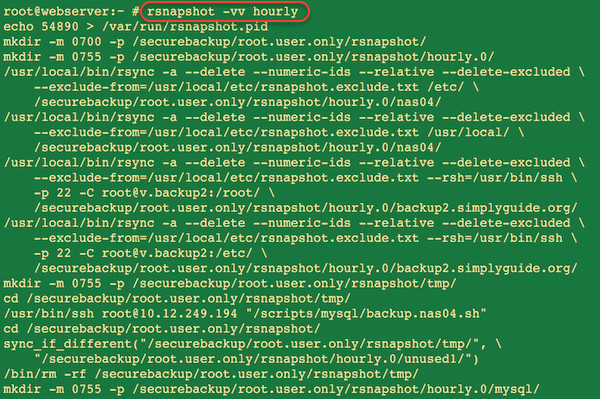
Type the following command to make hourly backup:# rsnapshot -v hourlySample outputs:
Fig.02: Rsnapshot in action
Configuring cron to run backups on FreeBSD
Type the following command to configure backup cron job:# crontab -eAppend the following entries:
30 */4 * * *  root      /usr/local/bin/rsnapshot hourly
40 21 * * *   root      /usr/local/bin/rsnapshot daily
20 22 * * 6   root      /usr/local/bin/rsnapshot weekly
10 23 1 * *   root      /usr/local/bin/rsnapshot monthly
Save and close the file.
How do I restore backups?
Let us say you would like to restore a backup for wwwserver1. Type the command as follows (select day and date from the ls -l output):#############################
# Login to your FreeBSD server #
# cd to backup location #
# Select hourly, weekly etc #
# scp or rsync to destination #
###################################
# cd /securebackup/root.user.only/rsnapshot/
# ls -l
# cd hourly.0/wwwserver1/
# scp -r var/www/ root@10.12.249.194:/var/www/And, there you have it, the rsnapshot backup utility installed and working correctly on the latest version of FreeBSD server to backup local and remote servers or desktop system.

No comments:
Post a Comment