http://xmodulo.com/access-linux-server-behind-nat-reverse-ssh-tunnel.html
You are running a Linux server at home, which is behind a NAT router or restrictive firewall. Now you want to SSH to the home server while you are away from home. How would you set that up? SSH port forwarding will certainly be an option. However, port forwarding can become tricky if you are dealing with multiple nested NAT environment. Besides, it can be interfered with under various ISP-specific conditions, such as restrictive ISP firewalls which block forwarded ports, or carrier-grade NAT which shares IPv4 addresses among users.
On homeserver, open an SSH connection to relayserver as follows.
The "-R 10022:localhost:22" option defines a reverse tunnel. It forwards traffic on port 10022 of relayserver to port 22 of homeserver.
With "-fN" option, SSH will go right into the background once you successfully authenticate with an SSH server. This option is useful when you do not want to execute any command on a remote SSH server, and just want to forward ports, like in our case.
After running the above command, you will be right back to the command prompt of homeserver.
Log in to relayserver, and verify that 127.0.0.1:10022 is bound to sshd. If so, that means a reverse tunnel is set up correctly.
But in fact, there is a way to reach NATed homeserver directly with a single login to relayserver. For this, you will need to let sshd on relayserver forward a port not only from loopback address, but also from an external host. This is achieved by specifying GatewayPorts option in sshd running on relayserver.
Open /etc/ssh/sshd_conf of relayserver and add the following line.
Debian-based system:
Now from any other computer (e.g., clientcomputer), type the following command to gain access to NATed homeserver.
For a persistent tunnel, I am going to use a tool called autossh. As the name implies, this program allows you to automatically restart an SSH session should it breaks for any reason. So it is useful to keep a reverse SSH tunnel active.
As the first step, let's set up passwordless SSH login from homeserver to relayserver. That way, autossh can restart a broken reverse SSH tunnel without user's involvement.
Next, install autossh on homeserver where a tunnel is initiated.
From homeserver, run autossh with the following arguments to create a persistent SSH tunnel destined to relayserver.
The "-fN" option is passed to ssh command, which will let the SSH tunnel run in the background.
The "-o XXXX" options tell ssh to:
If you want an SSH tunnel to be automatically up upon boot, you can add the above autossh command in /etc/rc.local.
You are running a Linux server at home, which is behind a NAT router or restrictive firewall. Now you want to SSH to the home server while you are away from home. How would you set that up? SSH port forwarding will certainly be an option. However, port forwarding can become tricky if you are dealing with multiple nested NAT environment. Besides, it can be interfered with under various ISP-specific conditions, such as restrictive ISP firewalls which block forwarded ports, or carrier-grade NAT which shares IPv4 addresses among users.
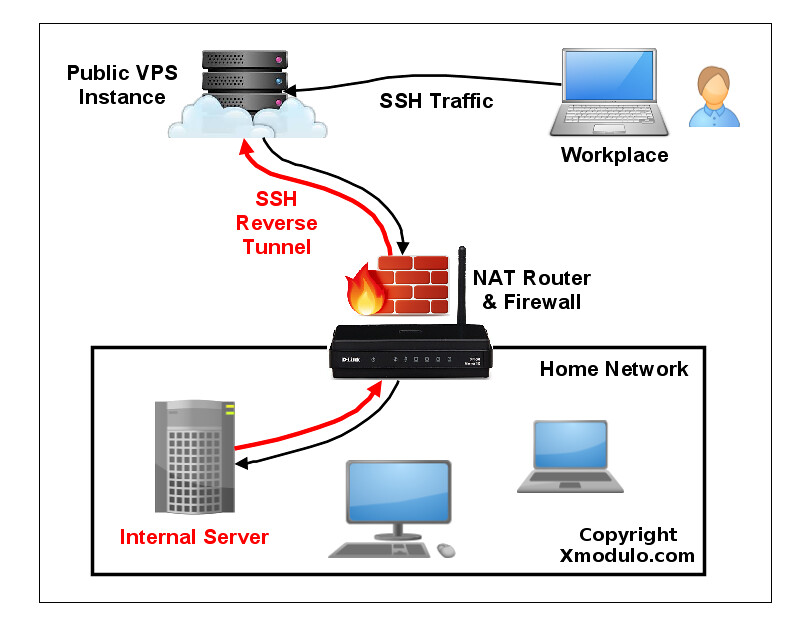
What is Reverse SSH Tunneling?
One alternative to SSH port forwarding is reverse SSH tunneling. The concept of reverse SSH tunneling is simple. For this, you will need another host (so-called "relay host") outside your restrictive home network, which you can connect to via SSH from where you are. You could set up a relay host using a VPS instance with a public IP address. What you do then is to set up a persistent SSH tunnel from the server in your home network to the public relay host. With that, you can connect "back" to the home server from the relay host (which is why it's called a "reverse" tunnel). As long as the relay host is reachable to you, you can connect to your home server wherever you are, or however restrictive your NAT or firewall is in your home network.Set up a Reverse SSH Tunnel on Linux
Let's see how we can create and use a reverse SSH tunnel. We assume the following. We will be setting up a reverse SSH tunnel from homeserver to relayserver, so that we can SSH to homeserver via relayserver from another computer called clientcomputer. The public IP address of relayserver is 1.1.1.1.On homeserver, open an SSH connection to relayserver as follows.
homeserver~$ ssh -fN -R 10022:localhost:22 relayserver_user@1.1.1.1
Here the port 10022 is any arbitrary port number you can choose.
Just make sure that this port is not used by other programs on relayserver.The "-R 10022:localhost:22" option defines a reverse tunnel. It forwards traffic on port 10022 of relayserver to port 22 of homeserver.
With "-fN" option, SSH will go right into the background once you successfully authenticate with an SSH server. This option is useful when you do not want to execute any command on a remote SSH server, and just want to forward ports, like in our case.
After running the above command, you will be right back to the command prompt of homeserver.
Log in to relayserver, and verify that 127.0.0.1:10022 is bound to sshd. If so, that means a reverse tunnel is set up correctly.
relayserver~$ sudo netstat -nap | grep 10022
tcp 0 0 127.0.0.1:10022 0.0.0.0:* LISTEN 8493/sshdNow from any other computer (e.g., clientcomputer), log in to relayserver. Then access homeserver as follows.
relayserver~$ ssh -p 10022 homeserver_user@localhost
One thing to take note is that the SSH login/password you type for localhost should be for homeserver, not for relayserver, since you are logging in to homeserver via the tunnel's local endpoint. So do not type login/password for relayserver. After successful login, you will be on homeserver.Connect Directly to a NATed Server via a Reverse SSH Tunnel
While the above method allows you to reach homeserver behind NAT, you need to log in twice: first to relayserver, and then to homeserver. This is because the end point of an SSH tunnel on relayserver is binding to loopback address (127.0.0.1).But in fact, there is a way to reach NATed homeserver directly with a single login to relayserver. For this, you will need to let sshd on relayserver forward a port not only from loopback address, but also from an external host. This is achieved by specifying GatewayPorts option in sshd running on relayserver.
Open /etc/ssh/sshd_conf of relayserver and add the following line.
relayserver~$ vi /etc/ssh/sshd_conf
GatewayPorts clientspecifiedRestart sshd.
Debian-based system:
relayserver~$ sudo /etc/init.d/ssh restart
Red Hat-based system:
relayserver~$ sudo systemctl restart sshd
Now let's initiate a reverse SSH tunnel from homeserver as follows.
homeserver~$ ssh -fN -R 1.1.1.1:10022:localhost:22 relayserver_user@1.1.1.1
Log in to relayserver and confirm with netstat command that a reverse SSH tunnel is established successfully.
relayserver~$ sudo netstat -nap | grep 10022
tcp 0 0 1.1.1.1:10022 0.0.0.0:* LISTEN 1538/sshd: devUnlike a previous case, the end point of a tunnel is now at 1.1.1.1:10022 (relayserver's public IP address), not 127.0.0.1:10022. This means that the end point of the tunnel is reachable from an external host.
Now from any other computer (e.g., clientcomputer), type the following command to gain access to NATed homeserver.
clientcomputer~$ ssh -p 10022 homeserver_user@1.1.1.1
In the above command, while 1.1.1.1 is the public IP address of relayserver, homeserver_user must be the user account associated with homeserver. This is because the real host you are logging in to is homeserver, not relayserver. The latter simply relays your SSH traffic to homeserver.Set up a Persistent Reverse SSH Tunnel on Linux
Now that you understand how to create a reverse SSH tunnel, let's make the tunnel "persistent", so that the tunnel is up and running all the time (regardless of temporary network congestion, SSH timeout, relay host rebooting, etc.). After all, if the tunnel is not always up, you won't be able to connect to your home server reliably.For a persistent tunnel, I am going to use a tool called autossh. As the name implies, this program allows you to automatically restart an SSH session should it breaks for any reason. So it is useful to keep a reverse SSH tunnel active.
As the first step, let's set up passwordless SSH login from homeserver to relayserver. That way, autossh can restart a broken reverse SSH tunnel without user's involvement.
Next, install autossh on homeserver where a tunnel is initiated.
From homeserver, run autossh with the following arguments to create a persistent SSH tunnel destined to relayserver.
homeserver~$ autossh -M 10900 -fN -o "PubkeyAuthentication=yes" -o
"StrictHostKeyChecking=false" -o "PasswordAuthentication=no" -o
"ServerAliveInterval 60" -o "ServerAliveCountMax 3" -R
1.1.1.1:10022:localhost:22 relayserver_user@1.1.1.1
The "-M 10900" option specifies a monitoring port on relayserver which will be used to exchange test data to monitor an SSH session. This port should not be used by any program on relayserver.The "-fN" option is passed to ssh command, which will let the SSH tunnel run in the background.
The "-o XXXX" options tell ssh to:
- Use key authentication, not password authentication.
- Automatically accept (unknown) SSH host keys.
- Exchange keep-alive messages every 60 seconds.
- Send up to 3 keep-alive messages without receiving any response back.
If you want an SSH tunnel to be automatically up upon boot, you can add the above autossh command in /etc/rc.local.

No comments:
Post a Comment