http://www.damagehead.com/blog/2015/04/28/deploying-a-dns-server-using-docker
This is the first part of a
series of how-to’s where I describe setting up and using various docker
containers for home and production use.
To start off this series we will use the sameersbn/bind docker image to setup a DNS server in production and host only environments.
BIND, developed by the Internet Systems Consortium, is a production-grade and by far the most popular and widely used opensource DNS server software available.
A couple of reasons to set up a DNS server.
By setting up a local DNS server you don’t rely on your ISP’s DNS servers which are often bogged down by incoming traffic which makes responses to DNS queries take longer to get serviced.
Besides performing domain name resolutions, a BIND server also acts as a DNS cache. This means that DNS queries could get serviced from the local cache. This in turn speeds up DNS responses.
Some ISP’s block access to websites by DNS spoofing. Setting up your own DNS server can help you get around this. However, a more effective way to circumvent this type of censorship is by using the tor browser which can be installed using the sameersbn/browser-box image.
Finally and most importantly, a local DNS server will enable you to define a domain for your local network. This allows you to address machines/services on the network with a name rather than its IP address. When setting up web services whether you do it using docker or otherwise, installing a DNS server makes the setup much simpler and easier to deal with.
Now lets “boot” the image…
Here is the gist of the equivalent configuration in docker-compose.yml form.
From this point on
The sameersbn/bind image includes webmin, a web-based interface for system administration, so that you can quickly and easily configure BIND. Webmin is launched automatically when the image is started.
If you prefer configuring BIND by hand, you can turn off webmin startup by setting
Finally, if
Alternately, on linux distributions that use Network Manager (virtually every linux distribution), you can add a dnsmasq configuration (
In the above example, regardless of the primary DNS configuration the DNS server at
After performing the
Finally, we can configure docker such that the containers are automatically configured to use our DNS server. This is done by adding

This is where we will perform the DNS configuration. Changes to the configuration can be applied using the Apply Configuration link in the top right corner of the page. We will create a domain named
We start by creating the reverse zone
Next, we create the forward zone
To complete this tutorial we will create a address (A) entry for
To create the A entry, select the zone

And now, the moment of truth…
These commands should return the DNS addresses as per our configuration. Time to find out.

And there you have it. A local DNS server with a local domain named
To start off this series we will use the sameersbn/bind docker image to setup a DNS server in production and host only environments.
BIND, developed by the Internet Systems Consortium, is a production-grade and by far the most popular and widely used opensource DNS server software available.
Introduction
The Domain Name System (DNS) server takes a fully qualified domain name (FQDN) such aswww.example.com and returns the corresponding IP address such as 93.184.216.34.A couple of reasons to set up a DNS server.
By setting up a local DNS server you don’t rely on your ISP’s DNS servers which are often bogged down by incoming traffic which makes responses to DNS queries take longer to get serviced.
Besides performing domain name resolutions, a BIND server also acts as a DNS cache. This means that DNS queries could get serviced from the local cache. This in turn speeds up DNS responses.
Some ISP’s block access to websites by DNS spoofing. Setting up your own DNS server can help you get around this. However, a more effective way to circumvent this type of censorship is by using the tor browser which can be installed using the sameersbn/browser-box image.
Finally and most importantly, a local DNS server will enable you to define a domain for your local network. This allows you to address machines/services on the network with a name rather than its IP address. When setting up web services whether you do it using docker or otherwise, installing a DNS server makes the setup much simpler and easier to deal with.
Setting up the image
Begin by fetching the image from the docker hub.1
| |
1 2 3 4 5 | |
-ddetaches, runs the container in the background--name='bind'assigns the namebindto the container--dns=127.0.0.1configures the dns of the container to127.0.0.1--publish=172.17.42.1:53:53/udpmakes the DNS server accessible on172.17.42.1:53--publish=172.17.42.1:10000:10000makes webmin accessible at https://172.17.42.1:10000--volume=/srv/docker/bind:/datamounts/srv/docker/bindas a volume for persistence--env='ROOT_PASSWORD=SecretPassword'sets the root password toSecretPassword
--publish=172.17.42.1:53:53/udp with --publish=53:53/udp (all interfaces) or something like --publish=192.168.1.1:53:53/udp (specific interface).From this point on
172.17.42.1 will refer to our local DNS server. Replace it with the appropriate address depending on your setup.The sameersbn/bind image includes webmin, a web-based interface for system administration, so that you can quickly and easily configure BIND. Webmin is launched automatically when the image is started.
If you prefer configuring BIND by hand, you can turn off webmin startup by setting
--env='WEBMIN_ENABLED=false' in the run command. The BIND specific configuration will be available at /srv/docker/bind/bind. To apply your configuration send the HUP signal to the container using docker kill -s HUP bindFinally, if
--env='ROOT_PASSWORD=SecretPassword' is not specified in the run command, a random password is generated and assigned for the root user which can be retrieved with docker logs bind 2>&1 | grep '^User: ' | tail -n1. This password is used while logging in to the webmin interface.Test the DNS server
Before we go any further, lets check if our DNS server is able to resolve addresses using the unixhost command.1
| |
www.google.comthe address to resolve172.17.42.1the DNS server to be used for the resolution
host command should return the IP address of www.google.com.Using the DNS server
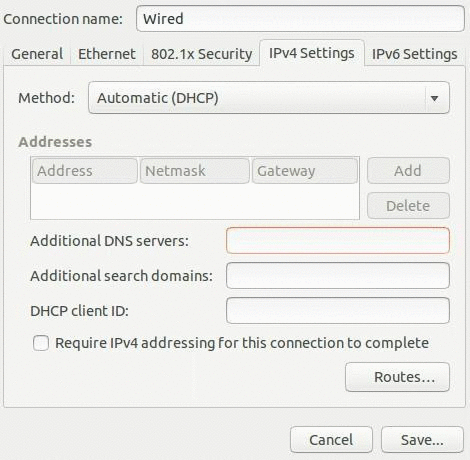
If you have setup a DNS server for your local network, you can configure your DHCP server to give out the DNS servers address in the lease responses. If you do not have a DHCP server running on your network (why?) you will have to manually configure it in the operating systems network settings.Alternately, on linux distributions that use Network Manager (virtually every linux distribution), you can add a dnsmasq configuration (
/etc/NetworkManager/dnsmasq.d/dnsmasq.conf) such that the local DNS server would be used for specific addresses, while the default DNS servers would be used otherwise.1 2 3 4 5 6 | |
172.17.42.1 will be used to resolve example.com and google.com
addresses. This is particularly useful in host only configurations when
you setup a domain to address various services on the local host
without having to manually change the DNS configuration everytime you
connect to a different network.After performing the
dnsmasq configuration the network
manager needs to be restarted for the changes to take effect. On Ubuntu,
this is achieved using the command restart network-managerFinally, we can configure docker such that the containers are automatically configured to use our DNS server. This is done by adding
--dns 172.17.42.1 to the docker daemon command. On Ubuntu, this is done at /etc/default/docker. The docker daemon needs to be restarted for these changes to take effect.Creating a domain using webmin
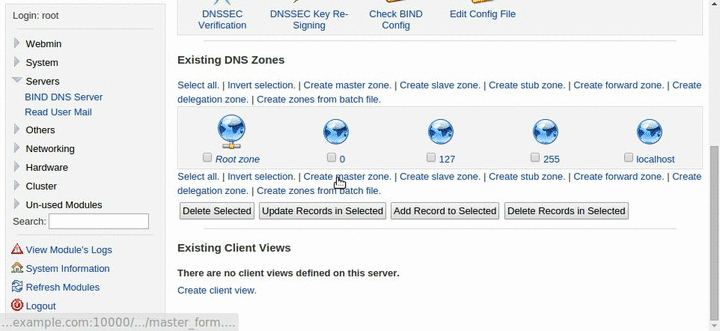
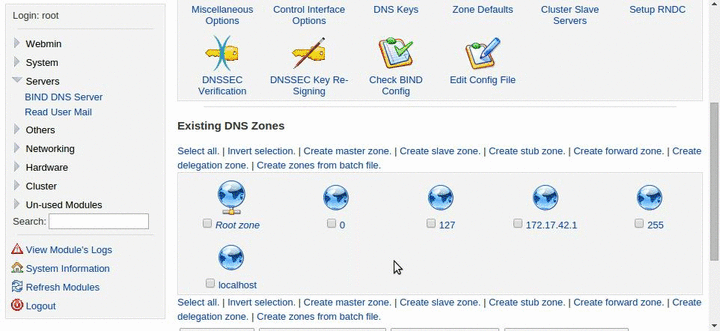
Point your web browser to https://172.17.42.1:10000 and login to webmin as userroot and password SecretPassword. Once logged in click on Servers and select BIND DNS Server.This is where we will perform the DNS configuration. Changes to the configuration can be applied using the Apply Configuration link in the top right corner of the page. We will create a domain named
example.com for demonstration purposes.We start by creating the reverse zone
172.17.42.1. This is optional
and required only if you want to be able to do reverse DNS (rDNS)
lookups. A rDNS lookup returns the domain name that is associated with a
given IP address. To create the zone select Create master zone and in the Create new zone dialog set the Zone type to Reverse, the Network address to your interface IP address 172.17.42.1, the Master server tons.example.com and finally set Email address to the domain administrator’s email address and select Create.Next, we create the forward zone
example.com by selecting Create master zone and in the Create new zone dialog set the Zone type to Forward, the Domain Name to example.com, the Master server to ns.example.com and set Email address to the domain administrator’s email address and select Create. Next, create the DNS entry for ns.example.com pointing to 172.17.42.1 and apply the configuration.To complete this tutorial we will create a address (A) entry for
webserver.example.com and then add a domain name alias (CNAME) entry www.example.com which will point to webserver.example.com.To create the A entry, select the zone
example.com and then select the Address option. Set the Name to webserver and the Address to 192.168.1.1. To create the CNAME entry, select the zone example.com and then select the Name Alias option. Set the Name to www and the Real Name to webserver and apply the configuration.And now, the moment of truth…
1 2 | |
And there you have it. A local DNS server with a local domain named
example.com.
No comments:
Post a Comment