http://www.cyberciti.biz/faq/howto-site-to-site-ipsec-vpn-between-cisco-openbsd-router-pfsense
I work from a small office/home office and I need to set up an IPSec site-to-site VPN between a Cisco/OpeNBSD IPSec-enabled gateway and firewall running PFSense. How do I configure the VPN tunnel so that I can access remote subnet and servers behiend a Cisco firewall/router securely? How do I setup a tunnel mode configuration which will provide you with an encrypted site-to-site network, allowing networks at multiple remote locations to be able to securely communicate using my PFSense located in my SOHO?
Internet
Protocol security (IPsec) uses cryptographic security mechanism to
protect communications over Internet Protocol (IP) networks. IPSec
protocol allows you to authenticate and encrypt all IP traffic between
your local office/datacenter/SOHO and remote location. You can pass all
traffic over the Internet or through networks which would otherwise be
considered insecure.In this faq, you will set up the VPN using
PFSense in tunnel mode (network-to-network VPNs) and use the ESP
protocol in order to encrypt the VPN traffic as it traverses the
Internet.
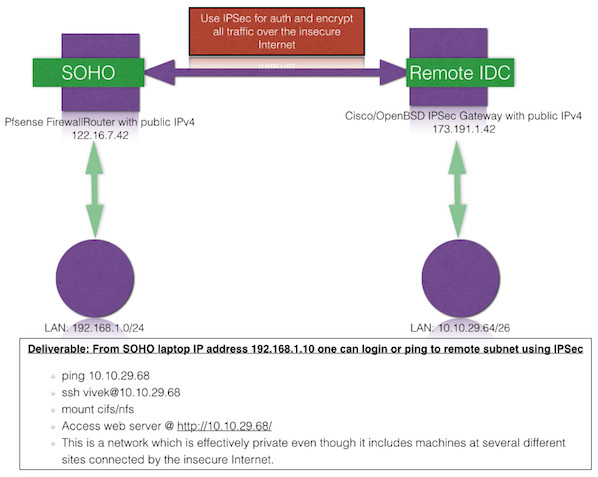
Above is a very simple site-to-site VPN, with a security gateway (SOHO and Remote IDC) linking two remote private networks 192.168.1.0/24 and 10.10.29.64/26. Remote IDC VPN is powered by either a Cisco/OpenBSD based system and local SOHO vpn (PFSense) gateways are already configured. From the above, you can see the IPSec config on is as follows:
Phase 2:
Sample outputs:

You will see screen as follows. Make sure you check Enable IPsec and click Save to enable IPsec:
You will see the message as follows on screen:

The Phase 2 information must be set as described in Phase 2 config table (see above):
You must set remote network as "10.10.29.64/26", Protcol to "ESP", Encrption algorithmes to "3DES", Hash algothrithms to "MD5", PFS key group to "2", lifetime to "3600" and finally click on the Save button and Apply changes button to activate the tunnel.
You will see the screen as follows:
Give it a few seconds to connect to the remote side. Once connected you will see the status as follows:
I work from a small office/home office and I need to set up an IPSec site-to-site VPN between a Cisco/OpeNBSD IPSec-enabled gateway and firewall running PFSense. How do I configure the VPN tunnel so that I can access remote subnet and servers behiend a Cisco firewall/router securely? How do I setup a tunnel mode configuration which will provide you with an encrypted site-to-site network, allowing networks at multiple remote locations to be able to securely communicate using my PFSense located in my SOHO?
| Tutorial details | |
|---|---|
| Difficulty | Advanced (rss) |
| Root privileges | Yes |
| Requirements | PFSense |
| Estimated completion time | 15m |
Our sample setup
Fig.01: A simple site-to-site VPN setup
Above is a very simple site-to-site VPN, with a security gateway (SOHO and Remote IDC) linking two remote private networks 192.168.1.0/24 and 10.10.29.64/26. Remote IDC VPN is powered by either a Cisco/OpenBSD based system and local SOHO vpn (PFSense) gateways are already configured. From the above, you can see the IPSec config on is as follows:
VPN config provided by a CISCO/OpenBSD gateway located in remote IDC
Phase 1:| Phase 1 config | Savings |
|---|---|
| Your peer IPv4 address | 122.16.7.42 |
| Cisco/OpenBSD gateway IPv4 address | 173.191.1.42 |
| Preshared Key | YOUR-super-secret-password-key |
| Encryption | 3DES |
| Authentication | MD5 |
| Diffie-Hellman Group | 2 |
| Keylife | 14400 |
| Phase 2 config | Values |
|---|---|
| Encryption | 3DES |
| Authentication | MD5 |
| Perfect Forward Secrecy (PFS) | Yes |
| Diffie-Hellman Group | 2 |
| Keylife | 3600 |
| SOHO Subnets | 192.168.1.0/24 |
| Remote Subnets | 10.10.29.64/26 and 10.12.249.192/26 |
PFSense appliance VPN IPSec configuration
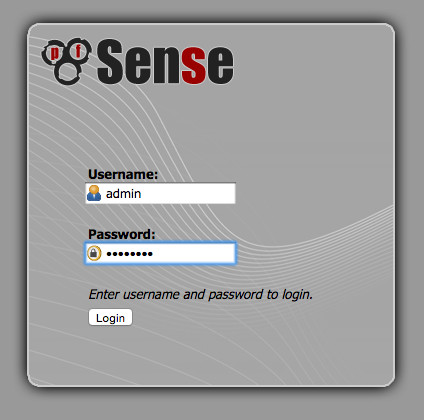
pfSense must be setup and working properly for the existing local network environment. Both locations must be using non-overlapping LAN IP subnets. For demo purpose my PFSense appliance located at https://192.168.1.254/.Step #1: Login to admin webui
Fire a browser and type the following url:https://192.168.1.254/Sample outputs:
Fig.02: PFSense admin Login Username and Password
Step #2: Setup the VPN Tunnel
Click on VPN > IPSec:
Fig.03: PFSense configure the vpn
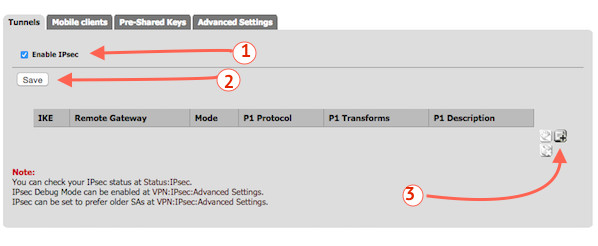
You will see screen as follows. Make sure you check Enable IPsec and click Save to enable IPsec:
Fig.04: Enable PFSense
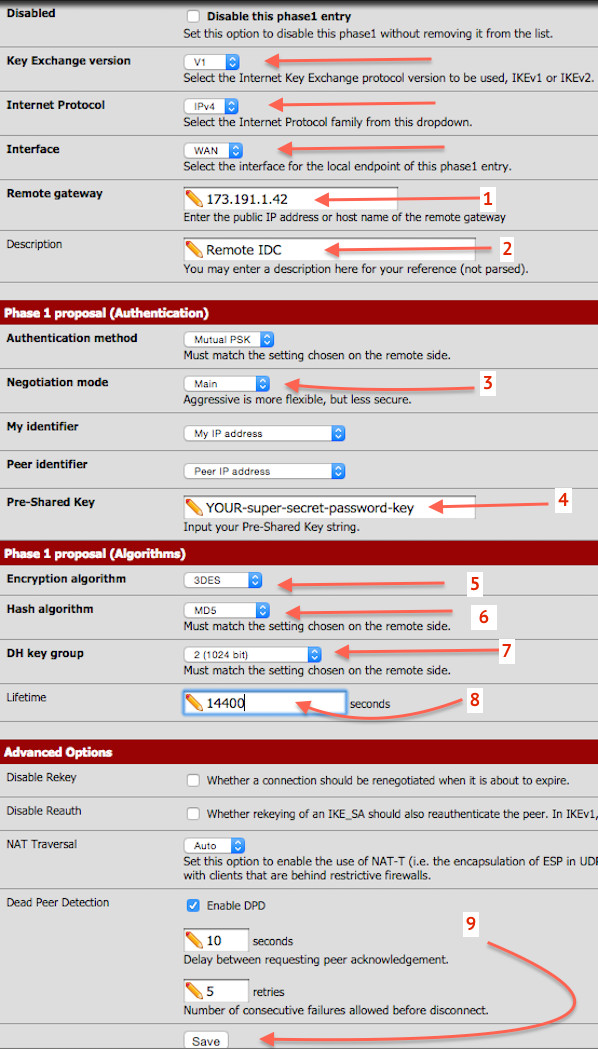
Step #3: Configure a new tunnel
Click on + button (see fig.04) to add a new IPsec tunnel Phase 1 configuration. Make sure Interface set to "WAN", Remote Gateway to "173.191.1.42", Authentication Method to Pre-Shared key to "YOUR-super-secret-password-key", Encryption to "3DES", Authentication to "MD5", Diffie-Hellman Group to "2", Keylife to "14400", and finally press the Save button.
Fig.05: PFSense New IPsec VPN Tunnel Phase 1 Configuration
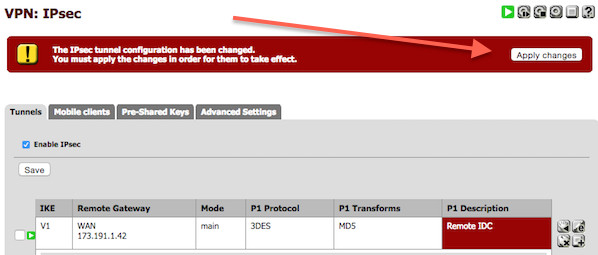
You will see the message as follows on screen:
The IPsec tunnel configuration has been changed. You must apply the changes in order for them to take effect.Click on the Apply changes button:
Fig.06: Saving Phase 1 Config
Step #4: Create a new Phase 2 config
To create a new Phase 2, click the large + inside the Phase 1 entry in the list, on the left-hand side. This expands the list to display all Phase 2 entries for this Phase 1. Click the + button on the right to add a new entry:
Gif 01: Create a new Phase 2 to build the VPN
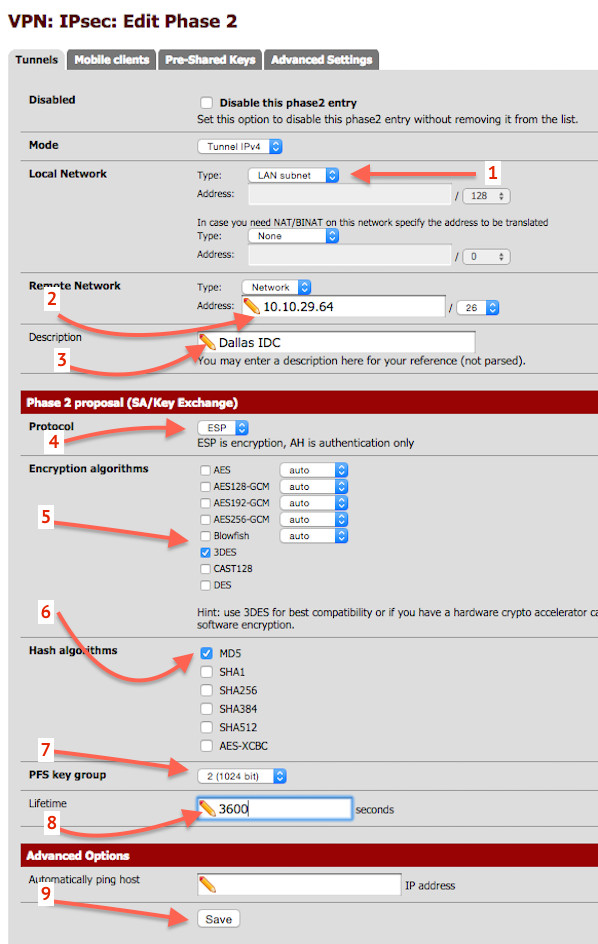
The Phase 2 information must be set as described in Phase 2 config table (see above):
Fig. 07: PFSense IPSec VPN Phase 2 Configuration
You must set remote network as "10.10.29.64/26", Protcol to "ESP", Encrption algorithmes to "3DES", Hash algothrithms to "MD5", PFS key group to "2", lifetime to "3600" and finally click on the Save button and Apply changes button to activate the tunnel.
Step #5: Add IPSec firewall rules
By default firewall rules are automatically added to the WAN to allow the tunnel to connect, but if the option to disable automatic VPN rules is checked, then manual rules may be required. The following rules added by the firewall (you can see them by typing the pfctl -sr | grep -i ipsec command at PFSense console)anchor "ipsec/*" all pass out on enc0 all flags S/SA keep state label "IPsec internal host to host" pass out route-to (rl0 192.168.0.1) inet proto udp from any to 173.191.1.42 port = isakmp keep state label "IPsec: SL IPsec - outbound isakmp" pass in on rl0 reply-to (rl0 192.168.0.1) inet proto udp from 173.191.1.42 to any port = isakmp keep state label "IPsec: SL IPsec - inbound isakmp" pass out route-to (rl0 192.168.0.1) inet proto udp from any to 173.191.1.42 port = sae-urn keep state label "IPsec: SL IPsec - outbound nat-t" pass in on rl0 reply-to (rl0 192.168.0.1) inet proto udp from 173.191.1.42 to any port = sae-urn keep state label "IPsec: SL IPsec - inbound nat-t" pass out route-to (rl0 192.168.0.1) inet proto esp from any to 173.191.1.42 keep state label "IPsec: SL IPsec - outbound esp proto" pass in on rl0 reply-to (rl0 192.168.0.1) inet proto esp from 173.191.1.42 to any keep state label "IPsec: SL IPsec - inbound esp proto"To setup IPSec firewall rules as per your needs, click on the Firewall > Rules and IPsec tab. Setup rules as per your needs.
How do I see the current status of the IPSec vpn?
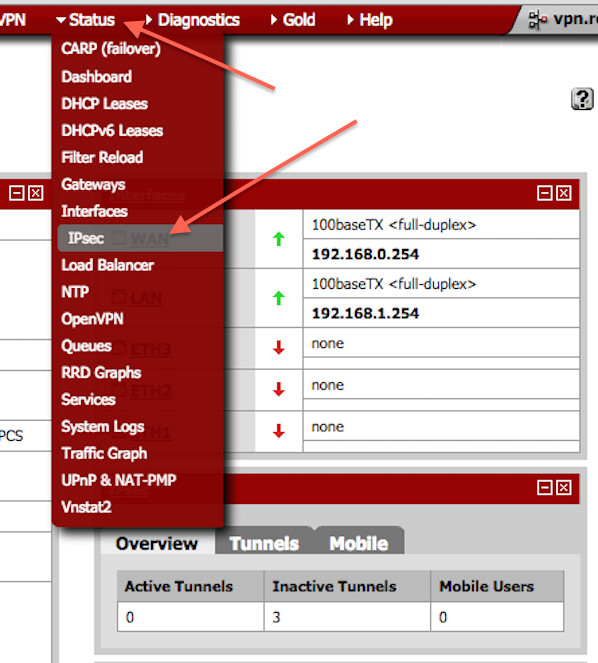
Click on the Status > IPSec:
Fig.08: PFSense IPSec Status: Connect or Disconnect VPN Tunnel
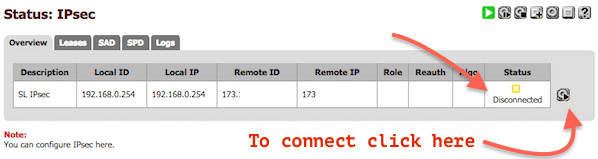
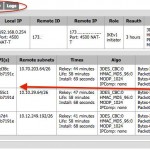
You will see the screen as follows:
Fig 09: Current IPSec Status
Give it a few seconds to connect to the remote side. Once connected you will see the status as follows:
-
- System logs: IPsec VPN
-
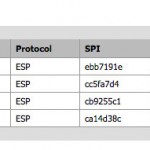
- IPsec: SAD
-
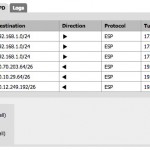
- IPsec: SPD
-
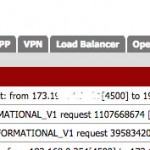
- System logs: IPsec VPN
How do I test my vpn setup?
Try to ping or ssh into one of the remote server:$ ping -c2 10.10.29.68 PING 10.10.29.68 (10.10.29.68): 56 data bytes 64 bytes from 10.10.29.68: icmp_seq=0 ttl=60 time=267.420 ms 64 bytes from 10.10.29.68: icmp_seq=1 ttl=60 time=271.900 ms --- 10.10.29.68 ping statistics --- 2 packets transmitted, 2 packets received, 0.0% packet loss round-trip min/avg/max/stddev = 267.420/269.660/271.900/2.240 ms $ ssh root@10.10.29.68And, there you have it, VPN up and running from your SOHO.

No comments:
Post a Comment