http://www.blackmoreops.com/2014/07/31/install-fonts-on-linux
Installing fonts is important for those who are multilingual or want
to spice up their screen. Many websites uses different fonts and without
having to install fonts on Linux, you wont see those, you will see a
flat boring default font. I will also show how to reconfigure your
fontconfig so that it looks better on your CRT or LCD screen.
This posts shows how you can install fonts and configure them on the following Linux Operating systems:
Let’s do an apt-cache search:
That means we are good to go. If not, follow the link above to add official repositories for Kali Linux (or if you’re using Debian Linux or Ubuntu Linux (or even Linux Mint variants), go and add official repositories for that.)
Now install Microsoft TrueType core using a single command:
Here’s a list of other fonts that you can install, follow is a list of package names, that means you can use
This posts shows how you can install fonts and configure them on the following Linux Operating systems:
- Debian Linux
- Ubuntu Linux
- Linux Mint
- Kali Linux
- Any Debian or Ubuntu Variant such as Elementary OS
Contents [hide]
The basic – Microsoft TrueType core Fonts
This package allows for easy installation of the Microsoft True Type Core Fonts for the Web including:Andale Mono Arial Black Arial (Bold, Italic, Bold Italic) Comic Sans MS (Bold) Courier New (Bold, Italic, Bold Italic) Georgia (Bold, Italic, Bold Italic) Impact Times New Roman (Bold, Italic, Bold Italic) Trebuchet (Bold, Italic, Bold Italic) Verdana (Bold, Italic, Bold Italic) WebdingsYou will need an Internet connection to download these fonts if you don’t already have them.
NOTE: the package ttf-liberation contains free variants of the Times, Arial and Courier fonts. It’s better to use those instead unless you specifically need one of the other fonts from this package.
Install instructions:
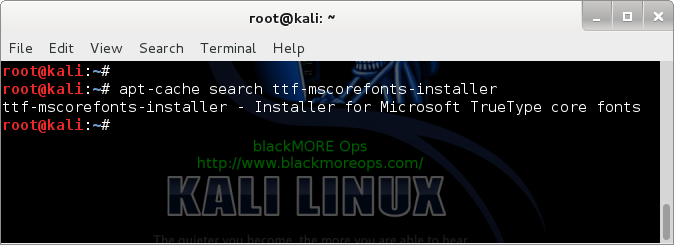
First of all let’s check if we even have those fonts in our repositories. I use Kali Linux which is a variant of Debian Linux. If you’re using Kali, you need to add the default official repositories.Let’s do an apt-cache search:
root@kali:~# apt-cache search ttf-mscorefonts-installer
ttf-mscorefonts-installer - Installer for Microsoft TrueType core fonts
That means we are good to go. If not, follow the link above to add official repositories for Kali Linux (or if you’re using Debian Linux or Ubuntu Linux (or even Linux Mint variants), go and add official repositories for that.)
root@kali:~#
root@kali:~# apt-get install ttf-mscorefonts-installer
(output below)
Note: If you’re behind a proxy server or TOR network, this install might not work, it seems you must be directly connected to Internet.Similar font package you can also install
Here’s a list of other fonts that you can install, follow is a list of package names, that means you can use
apt-get installto install these
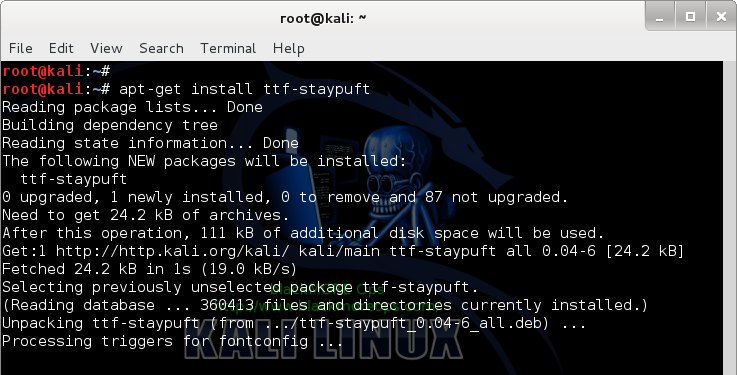
    ttf-liberation
    fonts-liberation
    ttf-uralic
    fonts-uralic
    ttf-root-installer
    ttf-freefont
    ttf-dustin
    ttf-linux-libertine
    fonts-linuxlibertine
    fonts-dustin
    ttf-staypuft
For example:
apt-get install ttf-staypuft
More ways to install fonts (XORG) on Debian, Ubuntu or other Debian (i.e. Kali Linux) based systems
Sometimes you download .ttf file (a font file) and you want to
install it directly. In that case, copy the font file to one of the
following directory.
The fonts can be copied in one of this directories:
- /usr/share/fonts
- /usr/share/X11/fonts
- /usr/local/share/fonts
- ~/.fonts
Here’s how the directories work.
If you want the fonts for everyone on the system (i.e. in a multiuser environment) then put them on /usr/share/fonts.
If you only want the fonts for yourself, then put them on ~.fonts directory of your home folder.
Once you’ve copied the files in correct places, issue the following command to which will read and cache all installed fonts from these directories.
Now if you want to list all installed and cached fonts on your system, you need to use fc-list command.
Sample output below:
The first option is if you want Native, Autohinter or None tuning for your fonts.
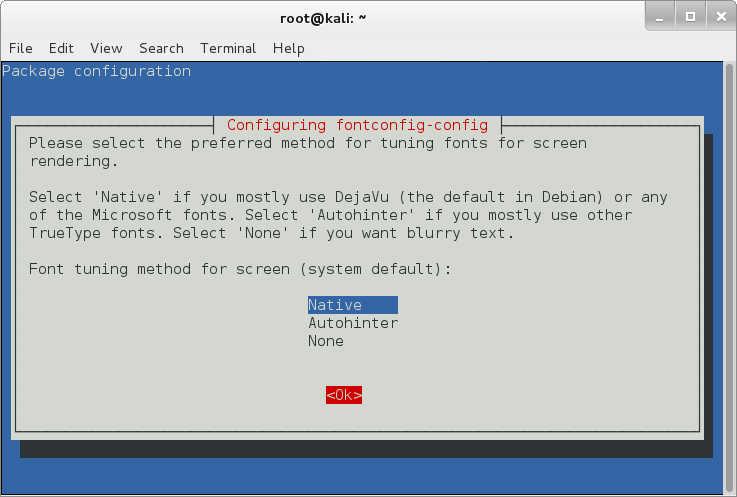
I’ve selected Native on the above screen and pressed Ok.
On the next screen, it will ask you whether you want to enable subpixel rendering for screen.
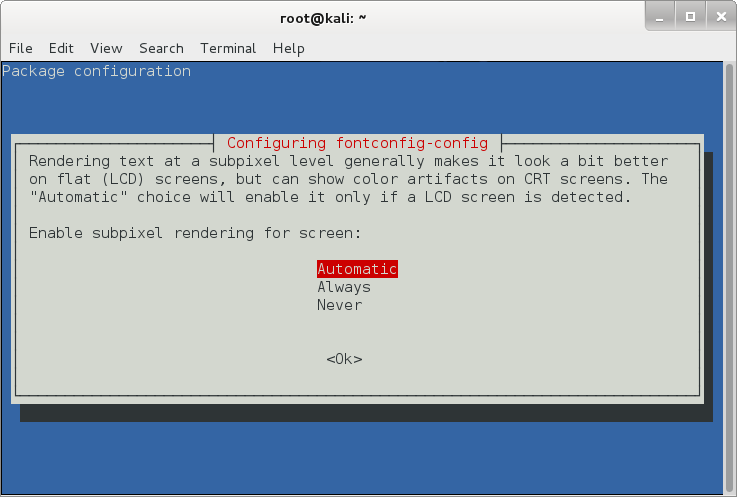
Obviously we want that, it makes fonts look a lot better on flat (LCD) screen, at the sametime if you’re using a CRT screen, it might break a few things. So automatic is the way to go. (in my personal case, I should’ve chosed Always and I am using a LCD screen, the choice is yours to make). Press Ok to move to the next screen.
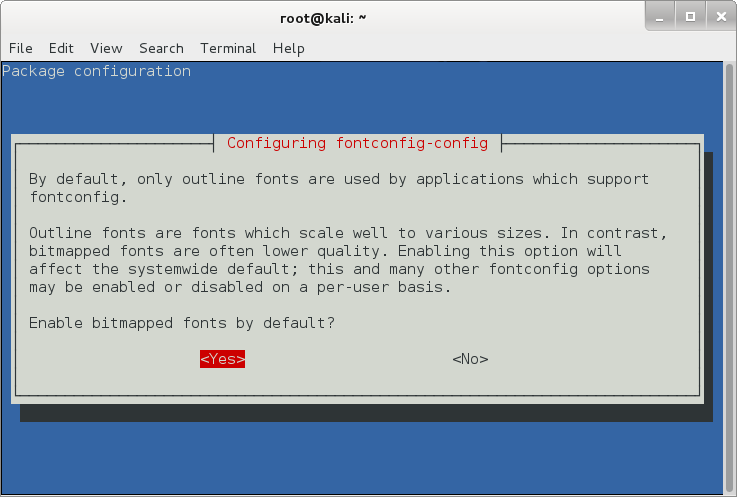
The last screen was asking me whether I want to enable bitmapped fonts by default. I selected Yes … (duh! I wasn’t actually sure, but heck, I can come back anytime and run the dpkg reconfigure command to fix any problems. So why not? )
Choose your option and press Enter.
So I decided I want to download a Gothic Font for fun.
Please note that I used -O old_london.zip file as the output name. It’s because the website doesn’t provide a direct link to the file.
Uncompress the file:
Move the font files (*.ttf) to /usr/share/fonts folder.
Confirm that the files exists in font cache now.
So now that we have fonts and all, lets type to see how it really looks like:
It reads
Thanks for reading. Please share.
If you want the fonts for everyone on the system (i.e. in a multiuser environment) then put them on /usr/share/fonts.
If you only want the fonts for yourself, then put them on ~.fonts directory of your home folder.
Once you’ve copied the files in correct places, issue the following command to which will read and cache all installed fonts from these directories.
root@kali:~# fc-cache -fv
Sample output below:
root@kali:~# fc-list
Configuring Fonts on Linux
Now if you want to reconfigure or configure hows fonts are displayed on your system, you use the following command:root@kali:~# dpkg-reconfigure fontconfig-configIt will present you with a series of options where you select what you want.
The first option is if you want Native, Autohinter or None tuning for your fonts.
I’ve selected Native on the above screen and pressed Ok.
On the next screen, it will ask you whether you want to enable subpixel rendering for screen.
Obviously we want that, it makes fonts look a lot better on flat (LCD) screen, at the sametime if you’re using a CRT screen, it might break a few things. So automatic is the way to go. (in my personal case, I should’ve chosed Always and I am using a LCD screen, the choice is yours to make). Press Ok to move to the next screen.
The last screen was asking me whether I want to enable bitmapped fonts by default. I selected Yes … (duh! I wasn’t actually sure, but heck, I can come back anytime and run the dpkg reconfigure command to fix any problems. So why not? )
Choose your option and press Enter.
Do fonts on your screen looks better now?
Downloading and installing a font
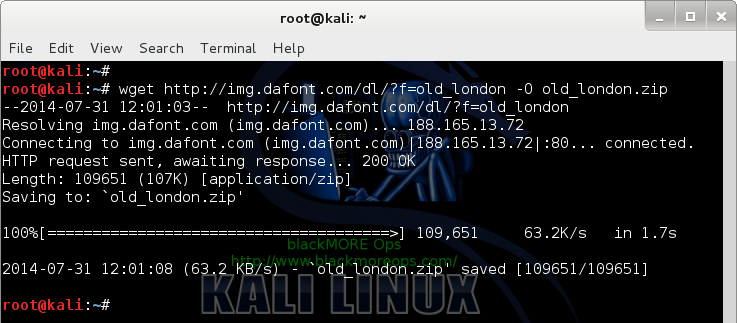
During my search I came across this great website that contains free fonts.http://www.dafont.com/So I decided I want to download a Gothic Font for fun.
root@kali:~# wget http://img.dafont.com/dl/?f=old_london -O old_london.zip
Please note that I used -O old_london.zip file as the output name. It’s because the website doesn’t provide a direct link to the file.
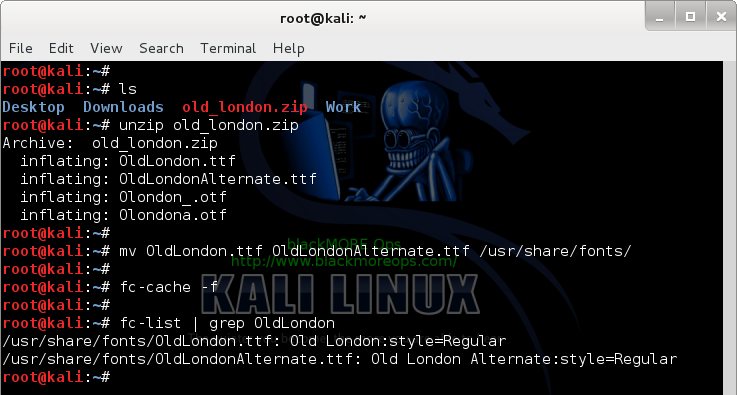
Uncompress the file:
root@kali:~# ls
Desktop  Downloads  old_london.zip  Work
root@kali:~# unzip old_london.zip
Archive:  old_london.zip
  inflating: OldLondon.ttf
  inflating: OldLondonAlternate.ttf
  inflating: Olondon_.otf
  inflating: Olondona.otf
root@kali:~#
Move the font files (*.ttf) to /usr/share/fonts folder.
root@kali:~# mv OldLondon.ttf OldLondonAlternate.ttf /usr/share/fonts/
root@kali:~#
Rebuild your font cache.
root@kali:~# fc-cache -f
root@kali:~#
Confirm that the files exists in font cache now.
root@kali:~# fc-list | grep OldLondon
/usr/share/fonts/OldLondon.ttf: Old London:style=Regular
/usr/share/fonts/OldLondonAlternate.ttf: Old London Alternate:style=Regular
root@kali:~#
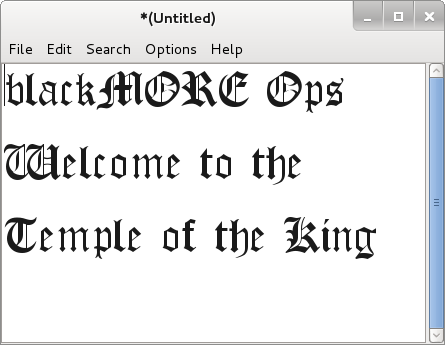
So now that we have fonts and all, lets type to see how it really looks like:
It reads
blackMORE Ops
Welcome to the
Temple of the King
(A song title from Rainbow in case you're wondering)
Conclusion:
The best take from this post would be installing new fonts. I think this solves font config for any Linux distributions. Enjoy and try out some interesting fonts.Thanks for reading. Please share.

No comments:
Post a Comment