http://xmodulo.com/2014/03/automatic-filesystem-checks-repair-linux.html
One of the most important tasks in Linux administration is to check the integrity of the filesystem. The Linux filesystem can be damaged under various circumstances, e.g., system crash, power loss, disconnected disk, accidentally overwritten i-node, etc. Thus it is a good idea to check the integrity of the filesystem regularly to minimize the risk of filesystem corruption. When it comes to checking and repairing Linux filesystem, fsck is a useful tool.
In this tutorial, I am going to describe how to set up automatic filesystem checks with fsck tool.
On Debian, Ubuntu or Linux Mint, edit /etc/default/rcS as follows.
From tune2fs output, you can see not only the filesystem state (clean or not), but also parameters that are related to filesystem checks. "Maximum mount count" parameter is the number of mounts after which the filesystem check gets triggered. "Check interval" parameter shows the maximum time between two filesystem checks. On most Linux distros, these parameters are not set by default, meaning no regular filesystem checks are occurring.
To force filesystem check for every 30 mounts, run the following command.
One of the most important tasks in Linux administration is to check the integrity of the filesystem. The Linux filesystem can be damaged under various circumstances, e.g., system crash, power loss, disconnected disk, accidentally overwritten i-node, etc. Thus it is a good idea to check the integrity of the filesystem regularly to minimize the risk of filesystem corruption. When it comes to checking and repairing Linux filesystem, fsck is a useful tool.
In this tutorial, I am going to describe how to set up automatic filesystem checks with fsck tool.
Trigger Automatic Filesystem Check upon Boot
If you want to trigger fsck automatically upon boot, there are distro-specific ways to set up unattended fschk during boot time.On Debian, Ubuntu or Linux Mint, edit /etc/default/rcS as follows.
$ sudo vi /etc/default/rcS
# automatically repair filesystems with inconsistencies during boot
FSCKFIX=yes
On CentOS, edit /etc/sysconfig/autofsck (or create it if it doesn't exist) with the following content.
$ sudo vi /etc/sysconfig/autofsck
AUTOFSCK_DEF_CHECK=yes
Force Regular Filesystem Checks
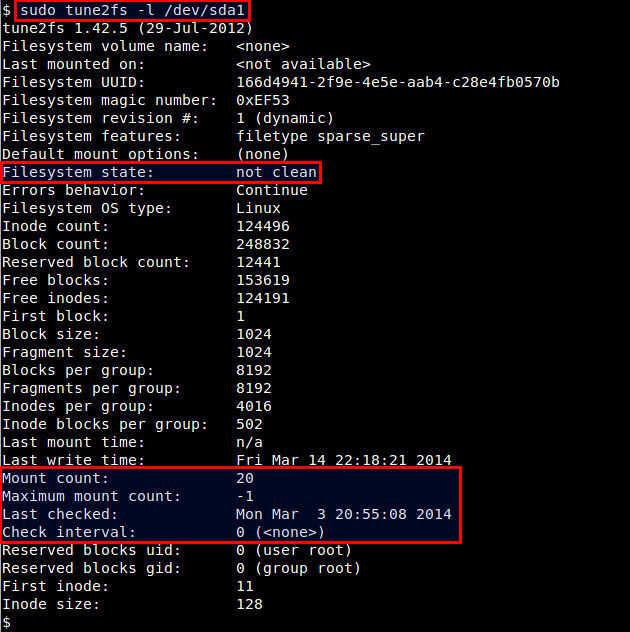
If the filesystem is large, you can force filesystem checks on a regular basis, instead of every boot time. In order to do so, first find out the filesystem configuration with tune2fs command. The following command line shows the current values of filesystem related parameters. Note that /dev/sda1 is the partition where the filesystem superblock is located.
$ sudo tune2fs -l /dev/sda1
From tune2fs output, you can see not only the filesystem state (clean or not), but also parameters that are related to filesystem checks. "Maximum mount count" parameter is the number of mounts after which the filesystem check gets triggered. "Check interval" parameter shows the maximum time between two filesystem checks. On most Linux distros, these parameters are not set by default, meaning no regular filesystem checks are occurring.
$ sudo tune2fs -c 30 /dev/sda1
To force filesystem check for every 3 months, use the command below.
$ sudo tune2fs -i 3m /dev/sda1
Now verify that newly added filesystem check conditions are set properly.
$ sudo tune2fs -l /dev/sda1
. . .
Last mount time:          n/a
Last write time:          Fri Mar 14 22:29:24 2014
Mount count:              20
Maximum mount count:      30
Last checked:             Mon Mar  3 20:55:08 2014
Check interval:           7776000 (3 months)
Next check after:         Sun Jun  1 21:55:08 2014
Force One-Time Filesystem Check on the Next Reboot
If you want to trigger one-time filesystem check on your next reboot, you can use this command.
$ sudo touch /forcefsck
Once you create an empty file named forcefsck in the top
directory (/) like above, it will force filesystem check the next time
you boot up. After successful booting, /forcefsck will automatically be
removed.
No comments:
Post a Comment